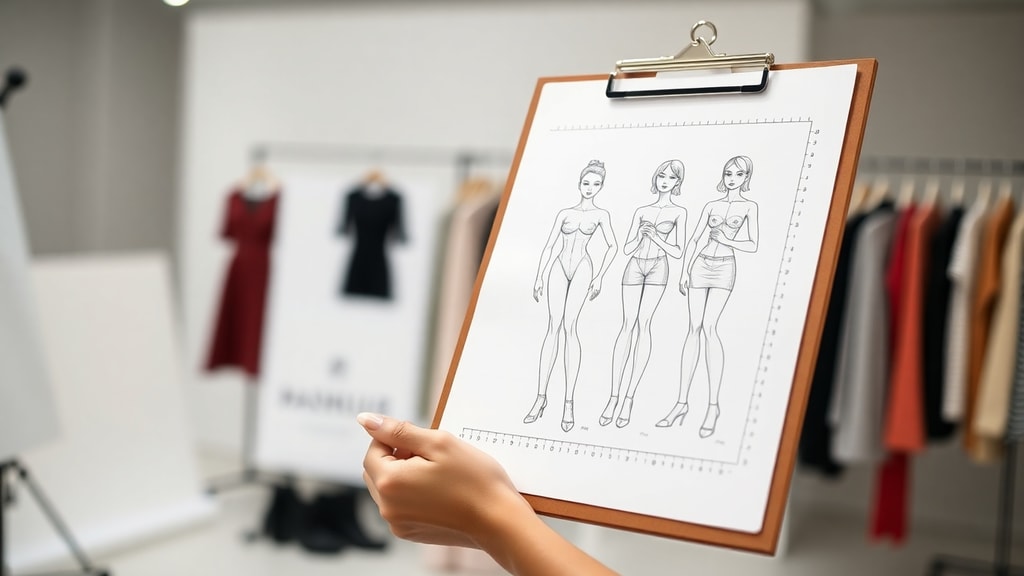
Introduction to Croquis Making
A croquis is a quick sketch that captures the essence of a design, often used in fashion to illustrate clothing on a stylized human figure. The term comes from French and means sketch or outline. For designers, a croquis serves as a visual blueprint, allowing them to experiment with proportions, fabric flow, and garment details before creating the final piece. This guide will walk you through the process of making a croquis from scratch, using simple steps that anyone can follow. Whether you are a beginner or an experienced artist, understanding how to create a croquis is essential for bringing your fashion ideas to life. The key is to focus on proportion and pose, ensuring the figure looks natural and balanced. By the end of this article, you will have the skills to draw your own croquis and use it as a foundation for your designs.
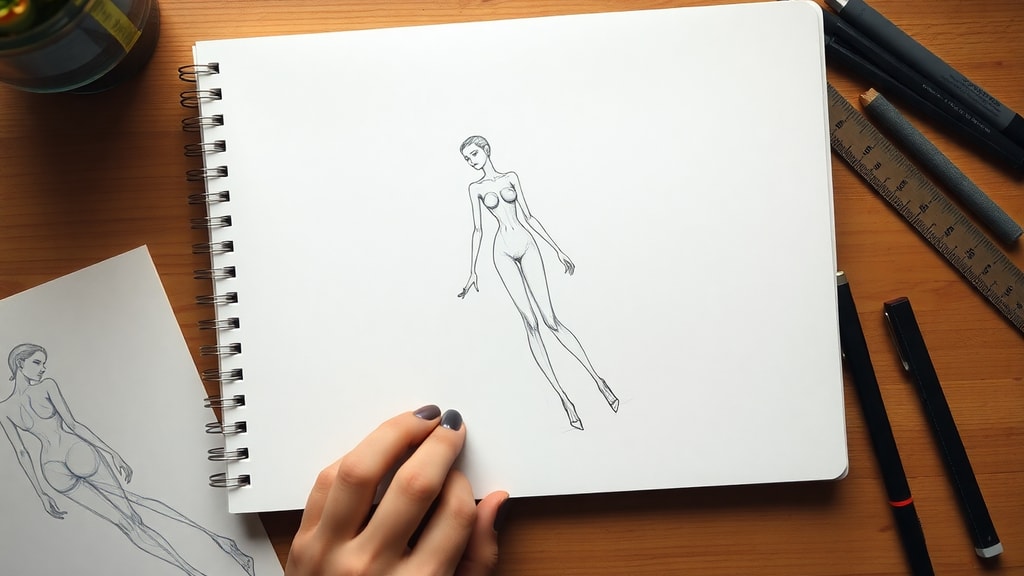
Define the Pose
The first step in creating a croquis is to choose a pose that best showcases the clothing or item you want to design. The pose should be natural and flattering, highlighting the garment's features without distracting from them. Common poses include standing straight with one leg slightly forward, or a more dynamic stance with a hand on the hip. The goal is to create a sense of movement and elegance. According to Audaces, a leading fashion technology company, the pose sets the tone for the entire sketch, so take your time to decide on a position that complements your design. For example, if you are designing a flowing dress, a pose with one arm raised can emphasize the fabric's movement. If you are working on tailored pants, a straight-on stance might work better. Remember, the pose should be simple enough to draw repeatedly but expressive enough to convey the garment's style.
Draw the Balance Line
Once you have chosen a pose, the next step is to draw the balance line. This is a vertical straight line that runs from the top of the head to the ground, representing the figure's center of gravity. The balance line is crucial because it ensures your croquis stands upright and looks stable. As Adar explains in their guide to fashion croquis, this line acts as the backbone of your sketch, helping you maintain symmetry and proportion. To draw it, lightly sketch a straight line down the center of your paper. This line will guide the placement of all other body parts. If your pose involves a shift in weight, such as one leg bearing more weight, the balance line should still remain vertical, with the hips and shoulders tilting slightly to maintain balance. Practice drawing this line until it becomes second nature, as it is the foundation of every croquis.

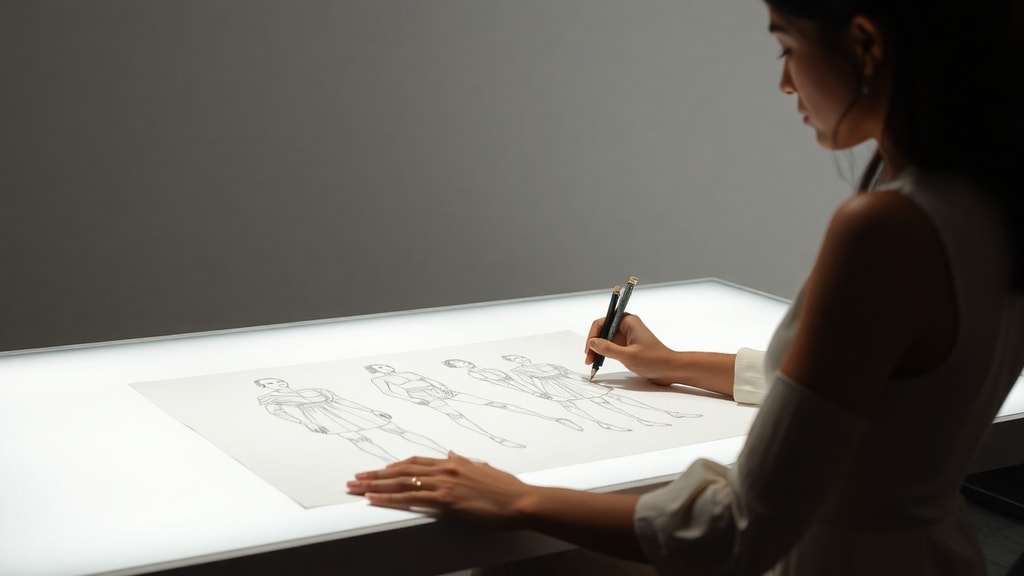
Divide into Head Units
Fashion croquis use exaggerated proportions to emphasize the clothing, typically dividing the body into nine head units. This means the total height of the figure is nine times the height of the head. According to WikiHow, this classic fashion proportion creates a tall, elegant silhouette that makes garments look more appealing. To apply this, measure the length of the head you have drawn and mark nine equal segments along the balance line. The first segment is the head itself, from the top of the skull to the chin. The second segment ends at the chest, the third at the waist, the fourth at the hips, and so on down to the feet. This system ensures that all body parts are in correct relation to each other, preventing common mistakes like arms that are too short or legs that are too long. For beginners, it is helpful to use a ruler or a piece of paper with marked increments to keep the divisions accurate.
Sketch Basic Shapes
With the head units in place, you can now sketch the basic shapes of the body. Start with an oval for the head, positioned at the top of the balance line. Then, using the head-unit guide, draw an hourglass shape for the torso and hips. Maximus Tecidos recommends using simple geometric forms to build the figure, as this makes it easier to adjust proportions later. The torso should be narrower at the waist and wider at the shoulders and hips, following the natural curves of the human body. For the hips, draw a rounded shape that aligns with the fourth head unit. The shoulders should sit at the second unit, and the waist at the third. Keep these shapes light and loose, as they are only guidelines. You can refine them later when adding details. The key is to capture the overall silhouette without getting bogged down in specifics at this stage.
Add Body Details
Once the basic shapes are in place, it is time to add specific body landmarks. According to Audaces, you should mark the shoulders, neck, elbows, hips, knees, and ankles using the head-unit divisions as reference points. The shoulders are typically at the second head unit, with the neck connecting the head to the torso. The elbows should fall at the waist level, which is the third head unit. The hips are at the fourth unit, the knees at the sixth, and the ankles at the eighth. These landmarks help you position the limbs correctly and ensure the figure looks anatomically plausible, even with exaggerated proportions. For example, when drawing the arms, the upper arm should extend from the shoulder to the elbow, and the forearm from the elbow to the wrist, which should be around the hip level. Similarly, the thighs go from the hips to the knees, and the calves from the knees to the ankles. Use light, curved lines to connect these points, creating a natural flow.
Draw Limbs and Finish
With the landmarks in place, you can now draw the limbs and refine the figure. Start with the arms, drawing them as tapered cylinders that follow the curves of the body. The hands should be simple shapes, often placed at mid-thigh level for a natural look. For the legs, draw them as elongated shapes that narrow at the ankles. Adar suggests that you should focus on smooth, continuous lines to create a polished appearance. Once the limbs are drawn, go back and refine the silhouettes, erasing any unnecessary guidelines. Pay attention to the curves of the waist, the slope of the shoulders, and the angle of the hips. The goal is to create a figure that looks graceful and balanced. Finally, add the feet, which can be simple wedge shapes or more detailed depending on the shoe design. Take your time with this step, as the quality of your croquis depends on the clarity of the lines.
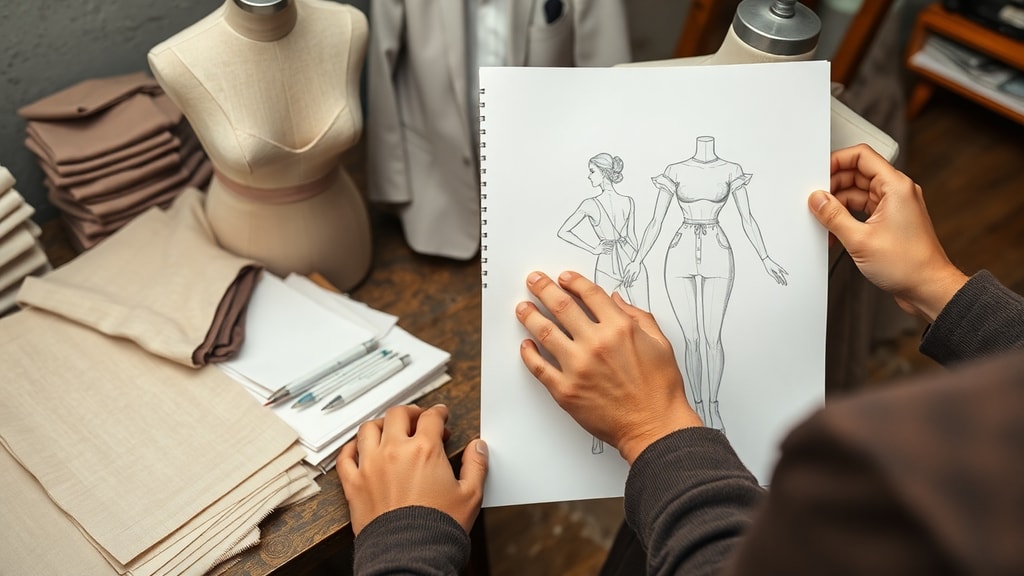
Illustrate Clothing
Now that the figure is complete, you can overlay the garment design. This is where your croquis comes to life. According to Audaces, the clothing should follow the fabric drape and body structure, meaning you need to consider how the material falls on the figure. For example, a fitted dress will hug the curves, while a flowing skirt will flare out from the waist. Use the croquis as a template, drawing the garment directly over the body. Pay attention to details like necklines, sleeves, and hemlines, ensuring they align with the figure's proportions. You can also add folds and wrinkles to suggest fabric texture. If you are designing multiple garments, create separate croquis for each one, or use tracing paper to layer different designs. This step allows you to experiment with colors, patterns, and silhouettes without committing to a final product.
Optional: Use Digital Tools
For those who prefer digital methods, there are many tools available to create croquis with precision. Software like Adobe Illustrator or specialized fashion design apps allow you to draw on a tablet or computer, making it easy to adjust proportions and add details. Additionally, you can use Google Earth or similar mapping tools to create croquis for architectural or landscape designs, as shown in various YouTube tutorials. Digital croquis offer the advantage of undo buttons, layers, and exact measurements, which can save time and reduce errors. However, the principles remain the same: start with a balance line, divide into head units, and build the figure step by step. Whether you choose traditional pencil and paper or a digital stylus, the key is to practice regularly to improve your skills.
Common Mistakes and Tips
Even experienced artists make mistakes when creating croquis. One common error is making the head too large or too small, which throws off the entire proportion. To avoid this, always use the head-unit system and check your measurements as you go. Another mistake is drawing stiff poses that lack movement. To fix this, study fashion magazines or online references to see how models stand. Practice sketching quick poses to loosen up your hand. A third issue is neglecting the balance line, resulting in figures that look like they are falling over. Always keep the balance line vertical, even if the pose is dynamic. Finally, do not be afraid to erase and redraw. Croquis are meant to be rough sketches, so perfection is not the goal. The table below summarizes the key steps and their purposes.
| Step | Purpose |
|---|---|
| Define the pose | Choose a natural stance to showcase the design |
| Draw the balance line | Establish the center of gravity for stability |
| Divide into head units | Set proportions for a tall, elegant figure |
| Sketch basic shapes | Build the body using simple geometric forms |
| Add body details | Mark key joints and landmarks for accuracy |
| Draw limbs and finish | Refine the figure with smooth, natural lines |
| Illustrate clothing | Overlay the garment design on the figure |
| Use digital tools | Enhance precision with software or apps |
List of Essential Materials
To get started with croquis making, you will need a few basic materials. Here is a list of items that will help you create professional-looking sketches:
- Pencil and eraser for initial sketches and corrections
- Ruler or straight edge for drawing the balance line and head units
- Sketchbook or drawing paper with a smooth surface
- Fine-tip markers or pens for outlining final lines
- Colored pencils or markers for adding color to garments
- Tracing paper for layering different designs
- Digital tablet and stylus if using software
Having these materials on hand will make the process smoother and more enjoyable. As you gain experience, you can experiment with different tools to find what works best for your style.
Conclusion
Creating a croquis is a fundamental skill for any fashion designer or artist. By following the steps outlined in this guide, you can develop a consistent method for drawing figures that highlight your designs. Remember to start with a clear pose, use the balance line for stability, and divide the body into head units for proportion. Sketch basic shapes, add details, and refine the limbs before illustrating the clothing. Whether you work traditionally or digitally, practice is key to improving your technique. For more in-depth tutorials, check out resources like Audaces for fashion-specific tips or WikiHow for step-by-step instructions. With time and dedication, you will be able to create croquis that effectively communicate your creative vision.
References
Audaces. Croqui de moda: passo a passo. Available at: https://audaces.com/pt-br/blog/croqui-moda. Accessed 2023.
Adar. Croqui de moda: guia passo a passo. Available at: https://blog.adar.com.br/guia-de-croqui-de-moda-passo-a-passo/. Accessed 2023.
WikiHow. How to Draw Fashion Sketches. Available at: https://pt.wikihow.com/Desenhar-Croquis-de-Moda. Accessed 2023.
Maximus Tecidos. Croqui Básico Reto. Available at: https://blog.maximustecidos.com.br/croqui-basico-reto/. Accessed 2023.
Google Earth tutorials. Como elaborar um croqui utilizando o Google Earth. Available at: https://www.youtube.com/watch?v=xWPWVv3k5Bg. Accessed 2023.