Understanding Volume Balance Settings
Volume balance settings allow you to adjust the sound levels between the left and right audio channels. This feature is essential for users who experience hearing differences between ears, use headphones with uneven speaker performance, or simply prefer a more customised audio experience. The balance control ensures that sound distribution matches your personal needs, whether you are listening to music, watching movies, or participating in online calls. Without proper balance, audio can feel skewed, causing one side to dominate and potentially leading to listener fatigue or discomfort. Adjusting these settings is a straightforward process that varies slightly across operating systems and devices.
Most modern systems include a dedicated balance slider within their sound settings. This slider ranges from left-heavy to right-heavy, with a neutral centre position providing equal output. You can modify this setting to correct hardware imbalances or to accommodate specific listening environments. For example, if you have hearing loss in one ear, you can shift the balance to deliver more sound to the stronger ear. Similarly, if your speakers are placed asymmetrically in a room, adjusting the balance can help create a more uniform soundstage.

Adjusting Volume Balance on Windows 10 and Windows 11
Windows offers multiple methods to modify audio balance, giving users flexibility depending on their preferred interface. The newer Settings app provides a modern approach, while the traditional Control Panel offers advanced options. Both methods achieve the same result, but the steps vary slightly. Below is a detailed guide for each approach.
Using the Settings App
To adjust balance through the Windows Settings app, first open the Start menu and click the gear icon to enter Settings. From there, navigate to System and then select Sound. Under the Output section, you will see a list of your audio devices. Click on the device you are currently using, such as your speakers or headphones. This action opens the device properties page. Scroll down to the Output settings section, where you will find a slider labelled Left and Right. Drag this slider to shift the balance toward the left or right channel. A centre position ensures equal volume on both sides. This method is available in both Windows 10 and Windows 11 and provides a clear, visual interface for fine-tuning.

Using the Control Panel
For users who prefer the classic Control Panel, the process begins by opening the Control Panel from the Start menu. Select Hardware and Sound, then click Sound. In the Sound window, you will see a list of playback devices. Double-click the device you want to adjust, such as your speakers or headphones. A new properties window appears. Click the Levels tab, then locate the Balance button. Clicking this button opens a small dialog box with sliders labelled L (Left) and R (Right). You can drag these sliders independently to precisely control the volume for each channel. This method offers finer granularity because you can set specific numeric values for left and right channels rather than just dragging a single slider. After making adjustments, click OK to apply the changes.
Quick Tip for Fast Access
If you need a faster way to reach the Sound settings, right-click the speaker icon in the system tray area of the taskbar. From the context menu, select Sounds. This action opens the same Sound window used in the Control Panel method. From there, you can proceed with the steps above to adjust balance. This shortcut saves you from navigating through multiple menus.
Adjusting Volume Balance on iPhone and iPad
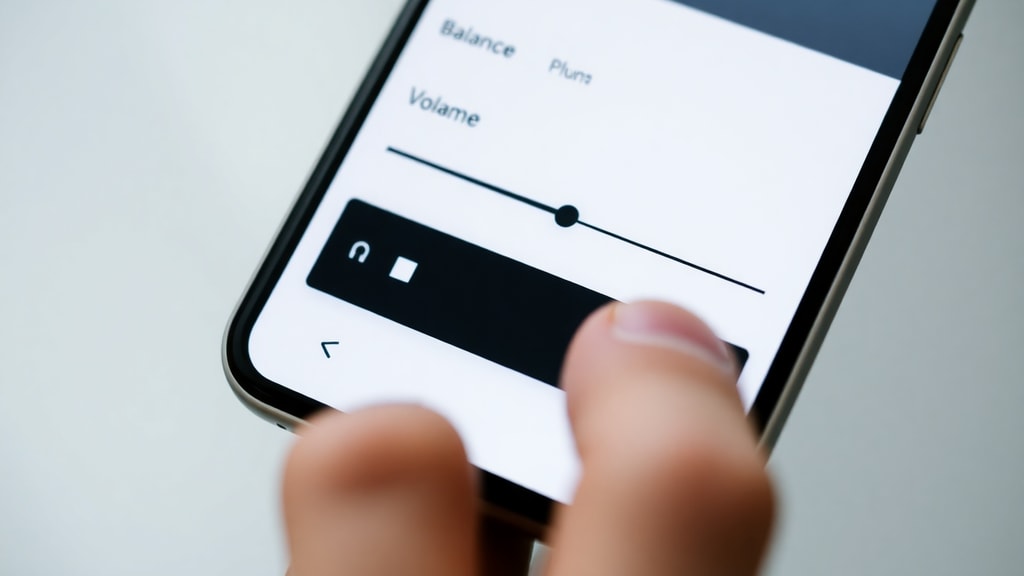
Apple iOS and iPadOS include balance settings primarily within the Accessibility menu. This design reflects the company’s focus on inclusivity, as balance adjustments can help users with hearing impairments. To change the balance on an iPhone or iPad, open the Settings app. Tap Accessibility, then select Audio/Visual. Under the Audio section, you will find a slider labelled Sound Balance. This slider allows you to move the balance left or right. The default centre position provides equal volume. Adjust the slider until the audio feels balanced for your needs. Note that this setting applies system-wide, affecting all audio output including music, videos, and phone calls. Unlike Windows, iOS does not offer a separate balance control per device because most audio output goes through the built-in speakers or connected headphones.
For users who use AirPods or other wireless headphones, the balance setting in Accessibility also affects those devices. However, some third-party apps may have their own internal balance controls, which can override the system setting. In such cases, check the app’s audio or settings menu for independent balance sliders.
Cross-Platform Notes and Common Practices
Volume balance adjustments are not limited to Windows and iOS. MacOS also includes a balance slider within the Sound preferences, accessible through System Settings. Android devices typically have balance controls under Accessibility or Sound settings, though the exact location varies by manufacturer. Regardless of the platform, the underlying principle remains the same: you are shifting the audio output between left and right channels. This feature is especially important for users with unilateral hearing loss or for those using mono audio setups. Some systems also offer a mono audio option, which combines left and right channels into a single stream, ensuring you hear all audio content through both ears. Balance adjustment and mono audio are complementary tools that can enhance your listening experience.
It is worth noting that balance settings are stored per user profile on most systems. If you share a computer or device with others, each person can adjust balance to their preference without affecting other accounts. Additionally, some audio drivers or sound cards may provide extra balance controls through proprietary software. Check your device manufacturer’s audio utility for additional options, such as room correction or equaliser settings that can further refine sound output.

Common Scenarios for Adjusting Balance
There are several situations where modifying balance becomes useful. The list below outlines typical cases where you might want to adjust these settings.
- Hearing asymmetry: if you have better hearing in one ear, you can shift balance to the weaker ear for more comfortable listening.
- Damaged hardware: a speaker or headphone driver may be failing on one side. Temporarily adjusting balance can extend usability until repairs are made.
- Recording or mixing: content creators often need to check stereo imaging by temporarily shifting balance to isolate channels.
- Environmental factors: if you sit off-centre relative to your speakers, adjusting balance can create a more natural sound field.
- Medical conditions: individuals with conditions like tinnitus may find relief by reducing volume on the affected side.
Each scenario requires a different approach, but the underlying adjustment method remains consistent across devices. The table below summarises the steps for the three major platforms discussed in this article.
| Platform | Access Path | Key Steps |
|---|---|---|
| Windows 10/11 (Settings) | Settings > System > Sound > Device properties | Adjust left/right slider under Output settings |
| Windows 10/11 (Control Panel) | Control Panel > Hardware and Sound > Sound | Double-click device, go to Levels, click Balance |
| iPhone/iPad | Settings > Accessibility > Audio/Visual | Move Sound Balance slider left or right |
This table provides a quick reference for users who need to locate balance controls on their device. The exact names of menus may vary slightly depending on software updates, but the general structure remains stable. If you cannot find the balance option, try searching for left/right in your device’s settings search bar.
Troubleshooting Common Issues
Sometimes adjusting balance does not produce the expected results. If you have set balance correctly but audio still sounds unbalanced, consider these potential causes. First, check the audio source itself. Some recordings or streaming services have inherent left-right differences due to mixing choices. Test with a mono sound file to rule out source issues. Second, verify that your audio cable or wireless connection is functioning properly. A loose cable or weak Bluetooth signal can cause intermittent imbalance. Third, inspect your headphones or speakers for physical obstructions or dirt that might muffle one side. Cleaning the audio ports and driver grills can restore clarity. If the problem persists, the hardware may have a defect that requires professional repair or replacement. In such cases, balance adjustment is a temporary workaround rather than a permanent fix.
Another common issue is that balance changes might reset after a system update or driver installation. To avoid this, note your preferred balance values so you can reapply them quickly. Some third-party audio enhancement software can also interfere with system balance controls. Disable such software temporarily to see if it resolves the problem. If you use external audio interfaces or digital-to-analogue converters (DACs), check their own control panels for separate balance settings that might override system settings.
References
Microsoft Learn. (n.d.). Adjust audio balance in Windows 11/10. Retrieved from https://learn.microsoft.com/answers/questions/4039065/balan-o-de-audio
Apple Support. (n.d.). Adjust audio balance on iPhone. Retrieved from https://support.apple.com/pt-pt/guide/iphone/iphb80ab7516/ios