Understanding Screen Refresh Rate and Its Importance
Screen refresh rate, measured in Hertz (Hz), determines how many times your display updates the image per second. A standard monitor typically runs at 60Hz, refreshing the image 60 times every second. Higher refresh rates like 120Hz, 144Hz, or 240Hz provide smoother motion and reduced input lag, which is particularly beneficial for gaming, video editing, and general visual comfort. Adjusting your screen refresh rate can significantly improve your computing experience, especially when transitioning between different types of content or hardware configurations.
Modern displays are capable of supporting multiple refresh rates, and the optimal setting depends on your specific hardware, connection type, and personal preference. For instance, a gaming monitor might support 144Hz over a DisplayPort connection but only 60Hz over HDMI. Understanding how to adjust this setting across different operating systems and display interfaces ensures you get the best performance from your equipment without pushing it beyond its capabilities.
Checking Your Current Display Capabilities
Before making any adjustments, it is essential to verify your monitor's maximum supported refresh rate. You can typically find this information in the user manual or on the manufacturer's website. The type of cable you use also plays a critical role. HDMI 1.4 supports up to 144Hz at 1080p, while HDMI 2.1 can handle 4K at 120Hz. DisplayPort 1.4 supports higher resolutions and refresh rates, making it the preferred choice for gaming monitors above 144Hz.
To identify which refresh rates are available for your current setup, check your system's display settings. Only refresh rates compatible with both your monitor hardware and your connection cable will appear in the selection menu. If you cannot see a rate you expect, the limitation is likely due to the cable version or the graphics card output. Upgrading to a higher specification cable sometimes unlocks additional options.
Adjusting Refresh Rate on Windows 10 and Windows 11
Both Windows 10 and Windows 11 provide a straightforward method for changing the refresh rate through the built-in settings application. This process works for built-in laptop screens as well as external monitors connected via HDMI, DisplayPort, or USB-C.
Begin by opening the Start menu and selecting Settings, represented by a gear icon. Navigate to System and then choose Display from the left sidebar. Scroll down until you see Advanced display settings and click on it. If you have multiple monitors, you will need to select the specific display you want to modify using the Choose a display dropdown menu. Under the Display information section, locate the Refresh rate dropdown. Click it and select your desired Hertz value, such as 60Hz, 120Hz, or 144Hz. Windows will briefly apply the change and prompt you to keep or revert the setting. Confirm to apply.
Using NVIDIA Control Panel for Fine-Tuned Control
If you have an NVIDIA graphics card, the NVIDIA Control Panel offers additional flexibility beyond the default Windows settings. This method is particularly useful when you need to set a custom resolution or adjust timing parameters for specific monitors.
To access this, right-click on your desktop and select NVIDIA Control Panel from the context menu. In the left navigation tree, expand the Display section and click Change resolution. Under the Select a monitor section, choose the display you want to configure. In the Refresh rate dropdown, select the desired value. Click the Apply button at the bottom right to save changes. The control panel may also allow you to create a custom resolution with a specific refresh rate if the default options do not include your desired combination.
Adjusting Refresh Rate on macOS
Apple provides a straightforward method for adjusting refresh rates on Mac computers, including MacBooks and external monitors. The process varies slightly between macOS Ventura and later versions compared to older systems.
For macOS Ventura and later, open System Settings by clicking the Apple logo in the top-left corner and selecting System Settings. In the sidebar, click Displays. If you have multiple displays, make sure you select the correct one by clicking its name at the top. Look for the Refresh Rate pop-up menu and choose your preferred setting. For older macOS versions, navigate to System Preferences instead of System Settings and follow the same path. Note that some monitors may require enable Variable Refresh Rate (VRR) or adaptive sync features to access specific ranges.
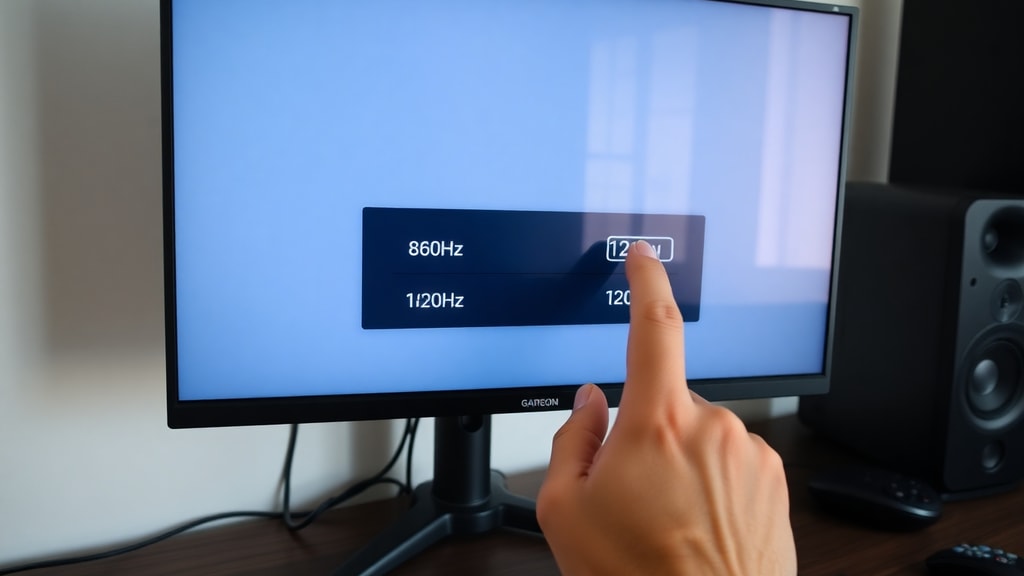
Using Monitor On-Screen Display for Direct Adjustment
Most modern monitors include an on-screen display (OSD) that allows you to change settings directly on the monitor without using your computer's operating system. This method is especially useful when you need to override operating system limitations or switch between preset modes like gaming, movie, or standard.
Locate the physical buttons or joystick on your monitor, usually found on the bottom bezel or the back of the screen. Press the Menu button to open the OSD. Navigate using the directional controls to find Picture, Display, or System settings, depending on your monitor brand. Look for an option labeled Refresh Rate, Timing, or Frequency. Select your desired value from the available list. Some monitors label this as Overclocking in a separate section. Save your changes and exit the menu. The monitor will adjust automatically.
Key Factors That Limit Available Refresh Rates
Several hardware and software factors determine which refresh rates your system can apply. Understanding these constraints prevents confusion when a desired option does not appear in the settings menu.
- Monitor hardware specifications: The physical display panel has a maximum native refresh rate you cannot exceed without risking damage.
- Cable version: Older HDMI and DisplayPort cables may not support high bandwidth needed for 144Hz at higher resolutions.
- Graphics card output: The GPU must be capable of driving the selected resolution and refresh rate simultaneously.
- Operating system limitations: Some drivers or display adapters cap available rates to prevent instability.
- Adaptive sync compatibility: Features like G-Sync or FreeSync can override or restrict certain manual settings.
For example, a typical 1080p monitor running over HDMI 1.4 will only show 60Hz in the dropdown, even if the monitor supports 144Hz over DisplayPort. Switching to a DisplayPort cable or upgrading to HDMI 2.0 usually unlocks the higher options.
Comparison of Common Refresh Rate Settings
The following table outlines typical refresh rate configurations for different use cases and hardware combinations:
| Refresh Rate | Best Use Case | Common Hardware Requirements |
|---|---|---|
| 60 Hz | General productivity, web browsing, office work | Any modern GPU and cable |
| 75 Hz | Casual gaming, improved scrolling smoothness | HDMI 1.4 or DisplayPort 1.2 |
| 120 Hz | Competitive gaming, VR, high-refresh monitors | DisplayPort 1.2+, HDMI 2.0+ |
| 144 Hz | E-sports, high-performance gaming | DisplayPort 1.3+, HDMI 2.0+ |
| 240 Hz | Professional gaming, ultra-smooth animation | DisplayPort 1.4+DSC, HDMI 2.1 |
Always match your refresh rate to your monitor's native capability and ensure adequate cooling for the GPU when running at higher frequencies for extended periods.

Common Issues When Changing Refresh Rate
Users sometimes encounter problems after adjusting the refresh rate. The most common issue is a black screen or flickering immediately after applying a new setting. This usually indicates the selected frequency is not supported by the monitor or cable. Windows and macOS typically revert to the previous setting after 15 seconds if you do not confirm the change, but this safety feature sometimes fails.
If you see a blank screen, wait for the automatic revert, or restart your computer in safe mode to reset display settings. On Windows, you can also press Windows Key + Ctrl + Shift + B to reset graphics drivers. For Mac users, holding Option during boot up can help access display reset options. Persistent issues may require trying a different cable, updating GPU drivers, or checking for monitor firmware updates on the manufacturer's website.
Optimizing Refresh Rate for Your Workflow
Selecting the right refresh rate depends on how you use your computer. For productivity tasks like word processing, spreadsheet work, and web browsing, 60Hz is sufficient and saves battery life on laptops. Gamers benefit from higher rates because they reduce screen tearing and provide smoother motion. Video editors and animators working with high frame rate content should set their displays to match their footage frame rate for accurate playback.
Some monitors support variable refresh rate technology like AMD FreeSync or NVIDIA G-Sync. These technologies dynamically adjust the refresh rate to match the frame output of your graphics card, eliminating stuttering and tearing without manual configuration. Enabling adaptive sync often requires a specific range of refresh rates, so check your monitor and GPU compatibility before setting a fixed value.
References
Microsoft. (2024). Change display settings. Microsoft Learn. Retrieved from learn.microsoft.com
NVIDIA. (2023). Setting up multiple displays and refresh rate. NVIDIA Support. Retrieved from www.nvidia.com
Apple. (2024). Change display refresh rate on Mac. Apple Support. Retrieved from support.apple.com
HP. (2023). Adjusting monitor OSD settings. HP Tech Section. Retrieved from www.hp.com
Dell. (2024). Display support and troubleshooting. Dell Support. Retrieved from www.dell.com